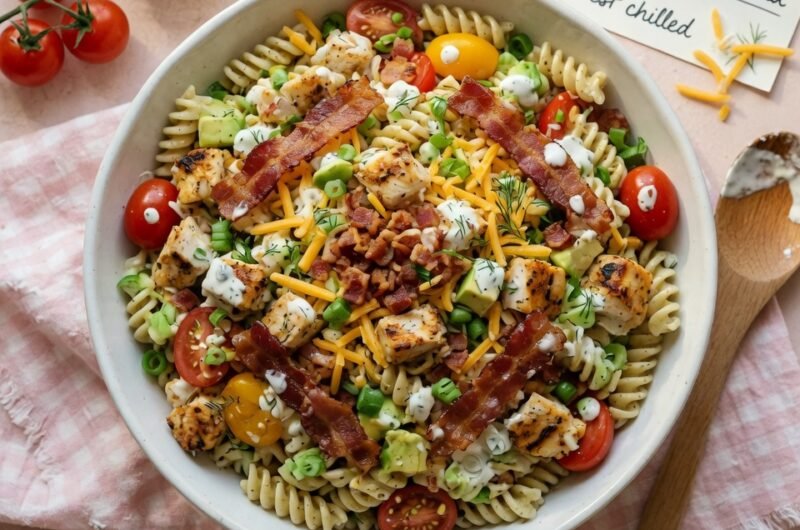
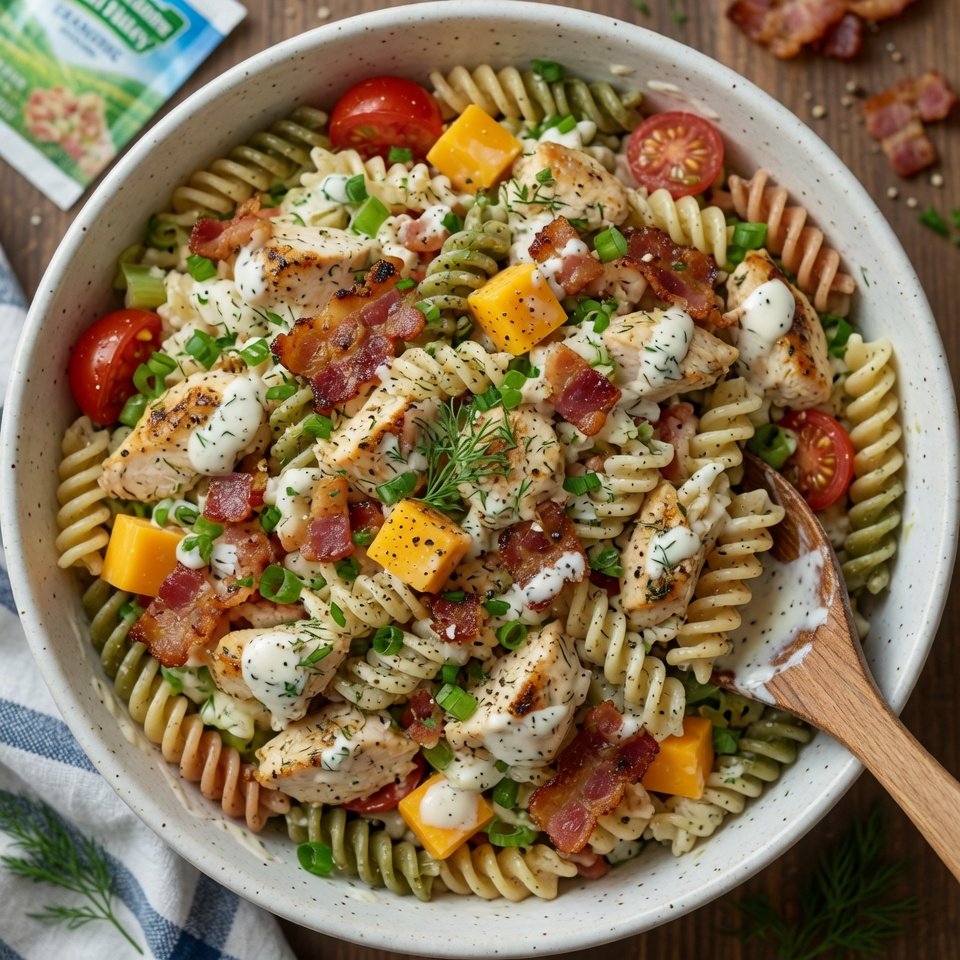
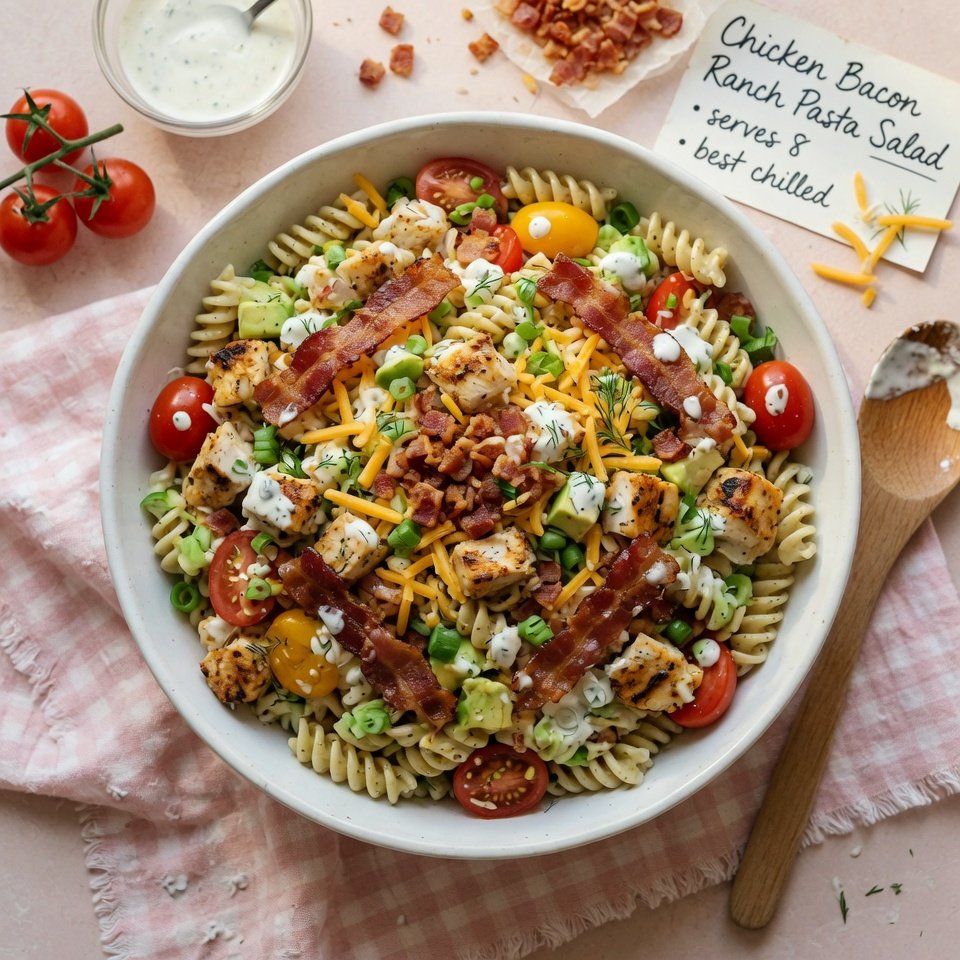
A creamy, crunchy, crowd-pleasing pasta salad loaded with tender chicken, crispy bacon, and sharp cheddar — the one that disappears first at every summer gathering.
📋 In This Article
Introduction
There’s a specific kind of chaos that defines a good potluck. Tables crowded with foil-covered dishes, someone asking where the serving spoons are, and that one aunt hovering protectively near her famous potato salad. I’ve brought a lot of dishes to these gatherings over the years — some memorable, many forgettable. But this Chicken Bacon Ranch Pasta Salad? It’s the one I get texts about the next day.
The combination sounds almost too simple. Chicken, bacon, ranch, pasta. But that’s exactly why it works. It hits every note people want: creamy, savory, crunchy, fresh. And unlike mayonnaise-based salads that turn tragic in the summer heat, the ranch dressing here stays stable and flavorful even after hours on a picnic table. Whether you’re feeding a crowd at a BBQ or meal-prepping lunches for the week, this recipe delivers.
Why This Recipe Works
Most pasta salads suffer from the same problem: they’re one-note. You get a bowl of gummy pasta with the occasional fleck of herb and a heavy slick of dressing that pools at the bottom. This Chicken Bacon Ranch Pasta Salad avoids that fate through intentional texture and flavor layering.
First, the pasta. Cavatappi or rotini are ideal here because their corkscrew shape grabs onto the dressing, ensuring every bite is seasoned rather than just coated. The ridges and curves act like flavor traps, holding onto bits of bacon, cheese, and herbs.
Second, the contrast. You have tender chicken, crispy bacon, crunchy celery, and sharp red onion. That textural variety keeps each bite interesting. The creamy ranch doesn’t just sit on top — it clings to the pasta and pulls everything together without drowning it.
Third, the chilling time. Pasta salads need time in the refrigerator. The flavors meld, the pasta firms up slightly, and the dressing loses that raw edge. Rush this step and you’ll wonder why it tastes flat. Give it 30 minutes and suddenly it’s cohesive.
Ingredients You’ll Need
For the Salad:
- 16 ounces cavatappi pasta (or rotini — you want a shape with curves and ridges)
- 1 rotisserie chicken (meat pulled and chopped, about 3 cups)
- 8 slices bacon (cooked until crisp and crumbled)
- 1 cup shredded sharp cheddar cheese
- 1 red onion (finely diced)
- 2 celery stalks (diced small)
- 2 tablespoons fresh parsley (chopped)
For the Dressing:
- 1 cup ranch dressing (homemade or high-quality bottled)
- 1 teaspoon garlic powder
- 1/2 teaspoon onion powder
- 1 teaspoon kosher salt
- 1/2 teaspoon black pepper
Optional Add-ins:
- 1 cup cherry tomatoes (halved)
- 1 cucumber (diced)
- 4 green onions (sliced)
- 1/2 cup frozen peas (thawed)
Step-by-Step Instructions
Step 1: Cook the Pasta Properly
Bring a large pot of water to a rolling boil. Add a generous tablespoon of salt — the water should taste like a seasoned soup. Add the pasta and cook until just past al dente, about 1 minute longer than the package directs.
Here’s why: pasta for cold salad absorbs dressing and softens further as it chills. If you cook it to perfect al dente for hot serving, it will be too firm once cold. Drain the pasta and rinse thoroughly under cold running water until completely cool. This stops the cooking process immediately and removes surface starch that would otherwise make the salad gummy.
Step 2: Prepare the Chicken
If using a rotisserie chicken, pull the meat from the bones and chop into bite-sized pieces. The skin can stay or go depending on your preference — I like leaving some on for extra flavor and texture.
If cooking chicken from raw: season boneless breasts with salt and pepper, then cook in a skillet over medium-high heat with a splash of oil until golden on both sides and the internal temperature reaches 165°F, about 6-7 minutes per side. Let rest 5 minutes before dicing. The resting matters — cutting immediately lets juices run onto the board instead of staying in the meat.
Step 3: Crisp the Bacon
Cook the bacon in a large skillet over medium heat until deeply crisp, about 7-10 minutes depending on thickness. Transfer to paper towels to drain. Once cool, crumble into pieces. Don’t use pre-crumbled bacon bits — the texture is wrong and the flavor is muted.
Step 4: Prep the Vegetables
While the pasta cooks, dice the red onion and celery into small, even pieces. You want everything roughly the same size as the pasta so no single ingredient dominates a bite. If adding optional vegetables like cherry tomatoes or cucumber, prep those now too.
Step 5: Make the Dressing
In a small bowl or jar, combine the ranch dressing, garlic powder, onion powder, salt, and pepper. Whisk or shake until fully combined. Taste — the dressing should be slightly over-seasoned on its own because the pasta and vegetables will dilute it.
Step 6: Combine Everything
In a large mixing bowl (the biggest one you have), combine the cooled pasta, chopped chicken, crumbled bacon, cheddar cheese, red onion, celery, and parsley. Pour the dressing over the top and toss gently but thoroughly using a large spoon or clean hands.
The first time I made this, I used a bowl that was too small and ended up wearing some of the dressing. Learn from my mistake.
Step 7: Chill Before Serving
Cover and refrigerate for at least 30 minutes before serving. This is non-negotiable. The pasta needs time to absorb the dressing and the flavors need time to marry. If you skip this, the salad will taste disjointed and the texture will be off.
Step 8: Final Adjustments
Before serving, give the salad a good toss. Pasta has a habit of absorbing dressing during chilling, so add a splash more ranch if it looks dry. Taste and adjust seasoning — it often needs another pinch of salt or a grind of pepper.
⚠️ Common Mistakes to Avoid
Overcooking the pasta. This is the fastest way to ruin a pasta salad. Mushy pasta can’t be fixed. Set a timer and check a minute early. The pasta should have a slight chew when hot, which translates to perfect texture once chilled.
Under-seasoning. Cold food requires more salt than hot food. Our taste buds perceive flavors less intensely at cooler temperatures. Taste the salad after chilling and don’t be shy with the salt shaker.
Skipping the chill time. Tossing everything together and serving immediately means the flavors haven’t melded. The onion will taste raw, the dressing will feel separate, and the pasta won’t have absorbed any of the seasoning.
Using low-quality ranch. Not all bottled ranch is created equal. If you’re not making it homemade, buy a brand you actually like the taste of. The dressing is the backbone of this salad — if it’s bad, the whole dish suffers.
Adding the bacon too early. If you’re making this more than a few hours ahead, hold the bacon until just before serving. Otherwise it softens and loses that crucial crunch.
Recipe Variations & Substitutions
This recipe is a framework, not a rulebook. Here’s how to adapt it:
Gluten-free: Use your favorite gluten-free pasta. Brown rice pasta holds up particularly well in cold salads, though corn-based versions work too. Just don’t overcook them — gluten-free pasta goes from firm to disintegrated faster than wheat pasta.
Lighter version: Substitute Greek yogurt for half the ranch dressing. You’ll get tang and creaminess with less fat. Turkey bacon works too, though it won’t crisp quite the same way as pork.
Vegetarian: Skip the chicken and bacon. Add chickpeas or white beans for protein, and use extra vegetables — diced bell peppers, cherry tomatoes, and avocado make it substantial. A sprinkle of smoked paprika mimics some of that bacon savoriness.
Different cheese: Sharp cheddar is classic, but pepper jack adds heat, crumbled blue cheese brings funk, and feta gives it a Mediterranean lean. Use what you have.
More vegetables: Corn, peas, diced bell peppers, and halved cherry tomatoes all belong here. Just keep the ratio roughly two parts pasta and mix-ins to one part dressing by volume.
Storage & Make-Ahead Tips
Chicken Bacon Ranch Pasta Salad keeps beautifully. Store in an airtight container in the refrigerator for up to 4 days. The texture is best on days one and two — after that, the pasta continues to soften and the vegetables lose their crunch.
For make-ahead convenience, prepare the components separately: cook and cool the pasta, chop the vegetables, make the dressing, and crisp the bacon. Store each in separate containers. Combine everything up to a day before serving. This approach keeps the bacon crisp and the vegetables fresh.
If you’ve already dressed the salad and it sits overnight, it may need a splash more ranch before serving. Pasta is thirsty — it continues absorbing dressing even in the refrigerator.
💡 Pro Tips for Potluck Perfection
Transporting pasta salad requires strategy. Use an insulated cooler or bag with ice packs if you’re traveling more than 30 minutes. Food safety matters — mayonnaise-based dressings shouldn’t sit in the danger zone (40°F to 140°F) for more than two hours.
For presentation, transfer the salad to a serving bowl and top with extra bacon crumbles, a sprinkle of parsley, and maybe some shredded cheese. The garnish isn’t just aesthetic — it signals freshness and invites people to dig in.
Bring a serving spoon. Potlucks never have enough serving spoons.
Finally, make more than you think you need. This salad goes fast, and the person who brings the empty bowl home looks like a hero.
Frequently Asked Questions (FAQ)
+What pasta shape works best for this salad?
Short, curved shapes with ridges are ideal. Cavatappi, rotini, fusilli, and farfalle all hold dressing well. Avoid smooth shapes like penne or rigatoni — the dressing slides right off. And definitely don’t use spaghetti or angel hair; long noodles are a nightmare to serve and eat at a potluck.
+Can I make this the night before?
Yes, and honestly, you should. The flavors improve overnight. Just hold the bacon back and add it right before serving so it stays crisp. If the salad looks dry after chilling, stir in a few tablespoons of ranch to loosen it up.
+How long does chicken bacon ranch pasta salad last in the fridge?
Properly stored in an airtight container, it keeps for 3 to 4 days. The texture is best in the first 48 hours. After that, the pasta softens and the vegetables lose their crunch. If it smells off or the dressing has separated significantly, toss it.
+Why does my pasta salad taste bland?
Cold temperatures mute flavors. You likely need more salt. Taste the salad after it’s fully chilled and adjust — it often needs more seasoning than you expect. Also check your ranch dressing; some bottled versions are surprisingly bland.
+Can I use homemade ranch dressing?
Absolutely. Homemade ranch — buttermilk, mayonnaise, fresh herbs, garlic — elevates this salad significantly. Just make sure it’s well-emulsified and thick enough to coat the pasta. A thin dressing will pool at the bottom of the bowl.
+What’s the best way to cook chicken for pasta salad?
Poaching keeps it moist and neutral, letting the dressing provide the flavor. Season the poaching liquid with aromatics. Grilling adds smokiness that complements the bacon. Or use rotisserie chicken — it’s already seasoned and convenient.
Chicken Bacon Ranch Pasta Salad
Ingredients
Method
- Cook pasta per box instructions then drain and rinse under cold water.
- Debone the rotisserie chicken and chop all the meat.
- Chop and slice remaining ingredients and add to a large salad bowl.
- Toss all ingredients, including cooked pasta, with the ranch dressing.
- Refrigerate for 2 hours for the best flavors.
Nutrition
Notes
- For extra flavor, consider cooking the rotisserie chicken in reserved bacon fat for a savory twist that enhances the overall dish.
- To prevent the pasta from sticking together, rinse it thoroughly under cold water after cooking to cool it down and remove excess starch.
- If you prefer a bolder taste, swap out green onions for red onions, which will add a sharper flavor to the salad.
- Let the pasta salad chill in the refrigerator for at least 2 hours before serving; this allows the flavors to meld beautifully, resulting in a more delicious dish.
- Store leftovers in an airtight container in the fridge for up to 4 days; for best results, enjoy cold without reheating to maintain the fresh textures.