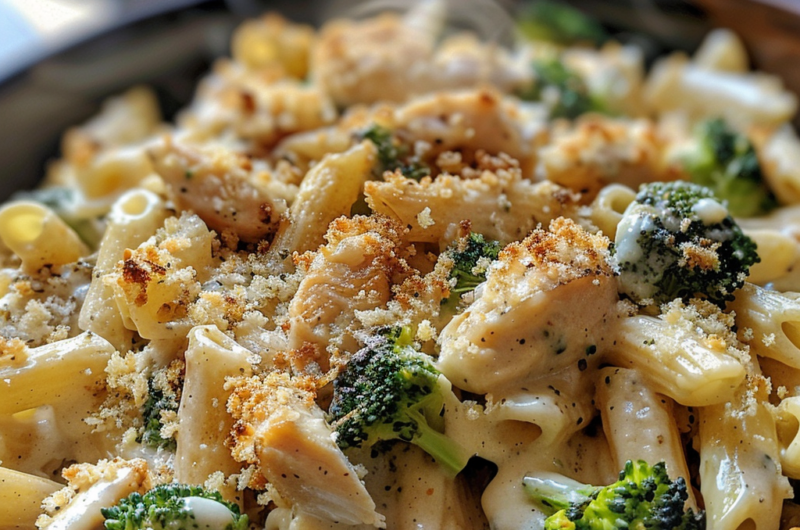
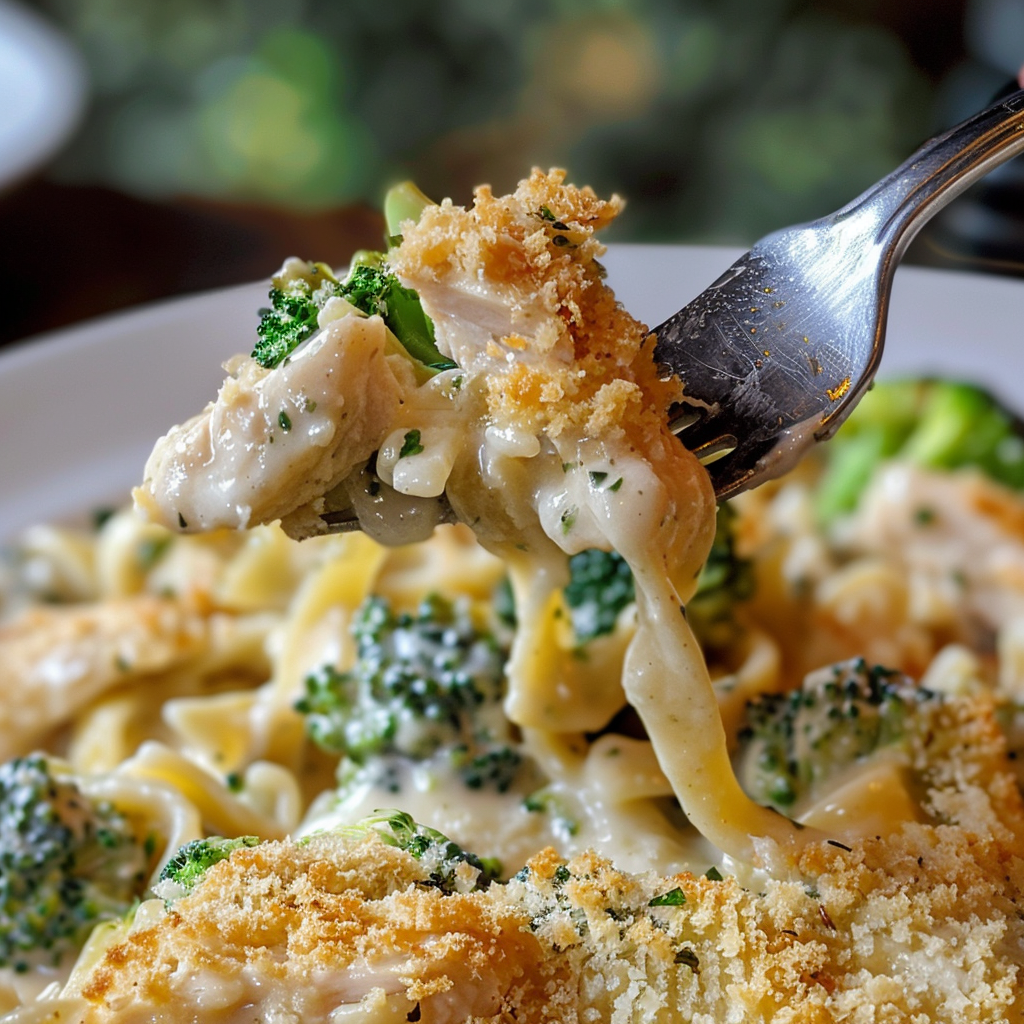
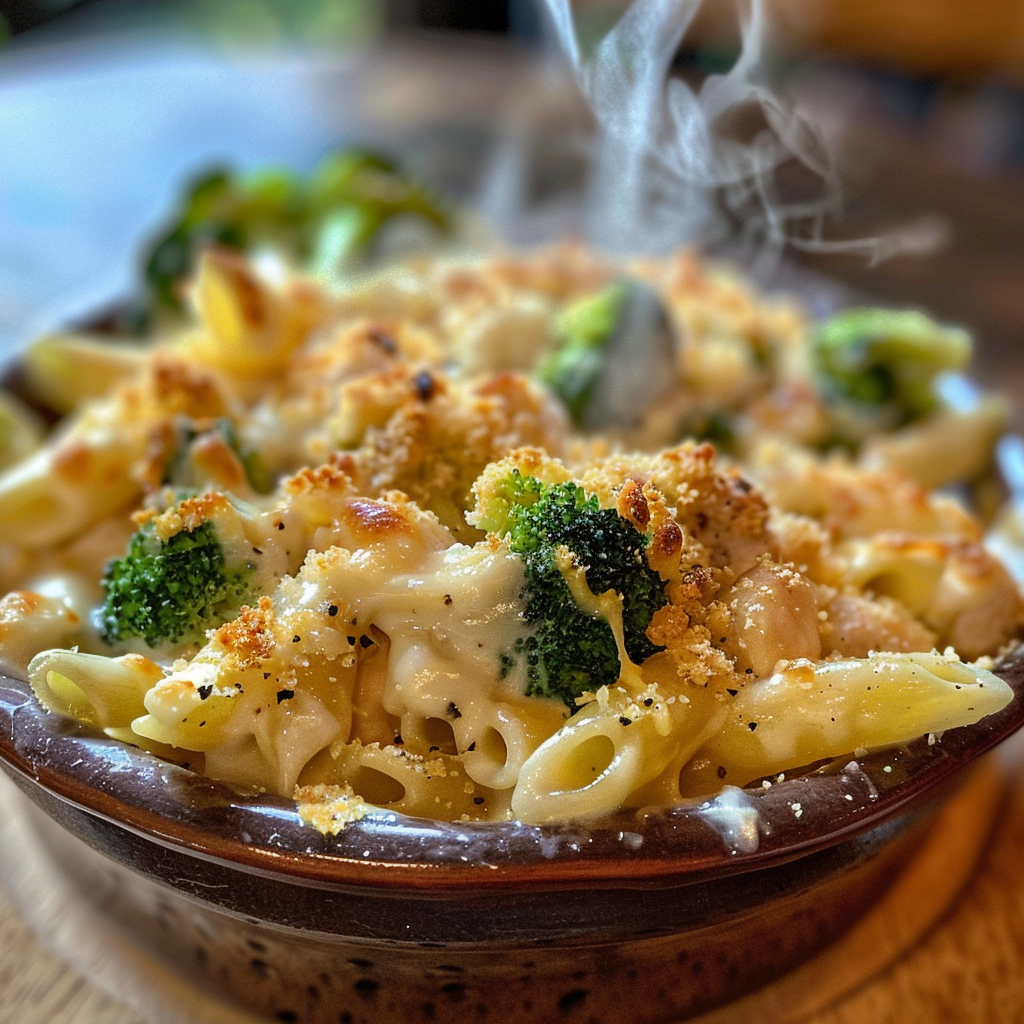
A weeknight hero: tender chicken, bright broccoli, and a velvety homemade Alfredo, all tucked under a crunchy panko lid.
📋 In This Article
Introduction
There is a specific kind of magic that happens when you combine pasta, cream, and a hot oven. It transforms simple, humble ingredients into something greater than the sum of their parts. This Chicken & Broccoli Alfredo Pasta Bake with Crispy Topping is the definition of comfort food, but we’re doing it right. We aren’t just dumping jars into a dish; we are building layers of flavor.
The goal here is contrast. You get the soft, yielding texture of the pasta and the velvety, rich Alfredo sauce, but then you hit that crispy, golden panko crust. It’s that textural interplay that makes this dish sing. And let’s be honest: getting a wholesome vegetable like broccoli into a cheese-laden casserole is a parenting win for the ages.
Why This Recipe Works
Most pasta bakes suffer from one fatal flaw: a broken, greasy sauce. This recipe solves that problem by treating the Alfredo with respect. We build a roux-based foundation (butter and flour) before adding the liquid. Why does this matter? The flour stabilizes the emulsion, ensuring your sauce stays creamy and cohesive even after 25 minutes in a hot oven, rather than separating into oil and curds.
Then there’s the broccoli. We steam it briefly before mixing it in. This step is crucial. If you throw raw florets into the bake, they’ll be crunchy and dry by the time the pasta is tender. Steaming ensures they are bright green and tender-crisp, ready to soak up the sauce without turning into mush.
Finally, the topping. We don’t just sprinkle dry breadcrumbs on top. We toss the panko with olive oil and Parmesan before baking. This guarantees that every single crumb toasts up golden brown, giving you that satisfying “shatter” when you dig your spoon in.
Ingredients
For the Pasta Bake:
- 10 oz pasta (penne or shells work best to trap the sauce)
- 1 lb boneless, skinless chicken breasts, cut into 1-inch pieces
- 4 cups broccoli florets, cut into bite-sized pieces
- 4 tablespoons unsalted butter
- 3 cloves garlic, minced
- 2 tablespoons all-purpose flour
- 1 cup whole milk
- 1 cup heavy cream
- 1 cup chicken broth
- 1 ½ cups freshly grated Parmesan cheese
- Salt and black pepper, to taste
- ½ teaspoon nutmeg (optional, but recommended for depth)
For the Crispy Topping:
- 1 cup panko breadcrumbs
- 2 tablespoons olive oil
- ¼ cup freshly grated Parmesan cheese
Step-by-Step Instructions
Step 1: Sear the Chicken
Start by cutting the 1 lb chicken breasts into bite-sized pieces. Season generously with salt and pepper. Heat a tablespoon of oil in a large oven-safe skillet or Dutch oven over medium-high heat. Add the chicken in a single layer.
Here is the science: let it be. Don’t poke or stir it for 3-4 minutes. You want the Maillard reaction to occur—that browning on the surface creates hundreds of new flavor compounds. Flip and cook another 3-4 minutes until cooked through. Remove the chicken and set aside.
Step 2: Prep the Pasta and Broccoli
Bring a large pot of salted water to a boil. Add the 10 oz pasta and cook until just shy of al dente (about 2 minutes less than the package instructions). The pasta will continue to cook in the oven, and we want to avoid a mushy disaster.
During the last 2 minutes of the pasta boiling, drop the 4 cups broccoli florets into the water. This blanches them quickly. Drain everything, reserving ½ cup of that starchy pasta water—it’s liquid gold for adjusting your sauce consistency later.
Step 3: Build the Alfredo Sauce
In the same pot you used for the chicken (don’t wash it—those browned bits on the bottom are pure flavor), melt the 4 tablespoons butter over medium heat. Add the 3 cloves minced garlic and sauté until fragrant, about 30 seconds.
Whisk in the 2 tablespoons flour. Cook for 1 minute to remove the raw flour taste; this is your thickening agent. Slowly whisk in the 1 cup milk, 1 cup heavy cream, and 1 cup chicken broth. Simmer gently for 3-4 minutes until the sauce coats the back of a spoon.
Remove from heat and stir in the 1 ½ cups Parmesan cheese. The residual heat will melt it perfectly. If the sauce seems too thick, splash in a bit of that reserved pasta water. Season with salt, pepper, and that optional but lovely pinch of nutmeg.
Step 4: Assemble and Top
Preheat your oven to 375°F (190°C). Toss the cooked pasta, broccoli, and seared chicken into the sauce. Stir to coat everything evenly.
In a small bowl, combine the 1 cup panko, 2 tablespoons olive oil, and ¼ cup Parmesan. Sprinkle this mixture evenly over the top of the casserole.
Step 5: Bake
Bake uncovered for 20-25 minutes. You’re looking for the sauce to be bubbling around the edges and the topping to be a deep, golden brown. If the crumbs are browning too fast, loosely tent with foil.
Let the dish rest for 5-10 minutes before serving. I know it’s hard to wait, but this resting period allows the sauce to thicken slightly as it cools, ensuring you get a creamy scoop rather than a runny mess.
⚠️ Common Mistakes to Avoid
Even a simple casserole can go wrong. Here is what to watch out for:
Overcooking the pasta. This is the most common error. Remember, the pasta will absorb liquid from the sauce and bake in a hot oven. If you cook it to “done” on the stove, it will be mush by the time it hits the table. Pull it two minutes early.
Using pre-shredded cheese. I used to buy the bags for convenience, but they contain anti-caking agents (like cellulose) that prevent the cheese from melting smoothly. For a velvety sauce, you must grate your own Parmesan from a block.
A soggy topping. Nothing is sadder than a pale, soft breadcrumb crust. Make sure you toss your panko with oil or butter. The fat conducts heat, allowing the crumbs to crisp up rather than just dry out.
Skipping the sear on the chicken. If you just boil or bake raw chicken in the sauce, it lacks depth. Taking the extra 5 minutes to sear the meat creates a fond (those browned bits) that adds a savory, meaty backbone to the entire dish.
Variations & Customizations
This recipe is a template. Once you have the base down, feel free to riff on it.
- Spicy Kick: Add ½ teaspoon of red pepper flakes to the garlic when you make the sauce. The heat cuts through the richness of the cream beautifully.
- The “Use-What-You-Have” Protein: This is a fantastic vehicle for leftover turkey after Thanksgiving, or even thick-cut bacon pieces. If using bacon, render the fat first and use that instead of butter for the sauce base.
- Vegetable Swaps: Not a fan of broccoli? Asparagus pieces or peas work wonderfully here. Just blanch them quickly so they don’t dry out in the oven.
- Gluten-Free Adaptation: Use gluten-free pasta and swap the all-purpose flour for cornstarch (mix 1 tablespoon cornstarch with cold water before adding to the sauce) or a 1:1 gluten-free flour blend.
Storage & Reheating Tips
Storage: Let the bake cool completely before covering. Store in the refrigerator for up to 3 days. The sauce will thicken considerably when cold—that’s normal.
Reheating: The microwave is fine for a quick lunch, but it often makes the sauce greasy. For best results, reheat portions in a 350°F oven covered with foil for about 15 minutes. The foil prevents the topping from burning while the center heats through.
Freezing: You can freeze this before or after baking. Wrap it tightly in plastic and foil. Thaw overnight in the fridge before baking (or reheating). Note that the texture of the pasta might soften slightly upon thawing.
💡 Pro Tips for the Perfect Alfredo Bake
Grate your own cheese. I cannot stress this enough. Pre-grated cheese is the enemy of a smooth emulsion. The stabilizers keep the cheese from melting into that silky pool we want.
Toast the panko first. If you want an extra layer of insurance for your topping, toast the panko in a dry skillet with a little butter until golden before sprinkling it on the bake. This ensures maximum crunch even if the sauce is particularly saucy.
Don’t rinse the pasta. When you drain the pasta, the starch remaining on the surface helps the sauce cling to the noodles. Rinsing washes that starch away, leading to a slippery, separated sauce.
Season at every step. Salt the pasta water. Salt the chicken. Taste the sauce. Building flavor in layers means you won’t have to over-salt the final dish to make it taste good.
Frequently Asked Questions (FAQ)
+Can I use rotisserie chicken for this recipe?
Absolutely. Using a store-bought rotisserie chicken is a great time-saver. You’ll need about 2 cups of shredded meat. Since the chicken is already cooked, skip the searing step and simply fold the shredded meat into the sauce at the end to warm through.
+Why did my Alfredo sauce separate in the oven?
Sauce separation usually happens when the heat is too high or the sauce lacks a stabilizer. This is why we use a roux (butter and flour) in this recipe—it acts as a binder. If your sauce looks broken, whisk in a splash of pasta water or milk to bring it back together.
+Can I make this pasta bake ahead of time?
Yes. You can assemble the entire dish up to 24 hours in advance. Keep it covered in the fridge. When you’re ready to eat, add the panko topping and bake. You may need to add an extra 10 minutes to the baking time if it’s going straight from the refrigerator to the oven.
+What is the best pasta shape for a bake?
Short, sturdy shapes with nooks and crannies are best. Penne, rigatoni, or shells hold the thick Alfredo sauce well. Avoid long strands like spaghetti or linguine, which tend to tangle and are difficult to serve in a casserole format.
+How do I know when the casserole is done?
The visual cues are key. You want to see the sauce bubbling actively around the edges of the dish. The panko topping should be a deep golden brown. If the topping is brown but the sauce isn’t bubbling, cover the top with foil and give it another 5-10 minutes.