
Light and Fluffy Pink Angel Food Cake Recipe
Ingredients
Method
- Preheat your oven to 350°F (175°C).
- Sift together the cake flour, 3/4 cup of the sugar, and salt.
- In a large bowl, whisk the egg whites until frothy.
- Add cream of tartar and continue whisking until soft peaks form.
- Gradually add the remaining 3/4 cup of sugar while whisking until stiff peaks form.
- Fold in the flour mixture gently using a spatula.
- Mix in the vanilla extract and food coloring until just combined.
- Pour the batter into an ungreased tube pan.
- Bake for 35-40 minutes or until the cake springs back when touched.
- Remove from the oven and invert the pan immediately.
- Let the cake cool completely before removing it from the pan.
- Gently run a knife around the edges to loosen and remove from the pan.
Tried this recipe?
Let us know how it was!Introduction
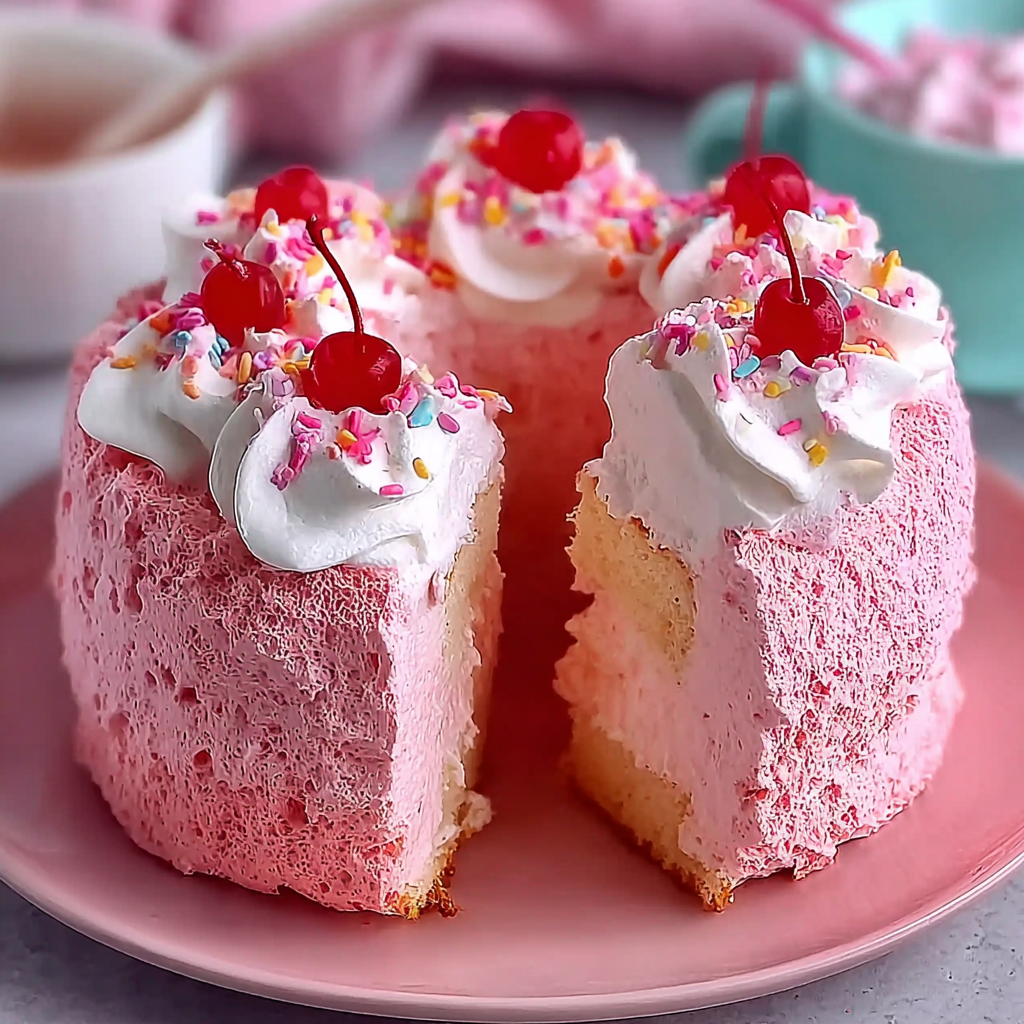
Pink Angel Food Cake is a delightful twist on the classic treat that brings a splash of color to your dessert table. With its airy texture and subtle sweetness, this cake is perfect for celebrations or simply as a light indulgence at home. The fluffy layers of cake, tinged with a soft pink hue, create an inviting appearance that makes it irresistible.
What sets Pink Angel Food Cake apart is not just its charming color but also its unique baking process. Made primarily with egg whites, it relies on whipped aeration to gain its volume, leaving behind a light and delicate result. This cake is not only a treat for the eyes but also a delightful experience for the palate.
Ingredients
- 1 cup cake flour, sifted
Cake flour is finely milled and has a lower protein content than all-purpose flour, resulting in a soft and tender cake. Sifted flour helps to aerate it, ensuring the final texture remains light. - 1 1/2 cups granulated sugar
Sugar sweetens the cake while also stabilizing the egg whites during whipping. The high sugar content contributes to the formation of a delicate crust while maintaining moisture. - 1/4 teaspoon salt
Salt enhances the overall flavor of the cake, balancing the sweetness and allowing the cake's flavors to shine through. - 1 teaspoon cream of tartar
Cream of tartar is an acid that helps stabilize the egg whites, preventing the formation of grains and ensuring a higher volume when whipped. - 8 large egg whites (at room temperature)
Egg whites are the foundation of angel food cake, providing the lift and structure. Room temperature eggs whip more easily, allowing for maximum volume. - 1 teaspoon vanilla extract
Vanilla extract adds a warm, aromatic flavor that enhances the sweetness of the cake, making it more enjoyable. - 1 tablespoon red food coloring (optional)
Food coloring gives the cake its signature pink hue. The amount can be adjusted based on how vibrant you want the color to be.
Directions & Preparation
Step 1: Preheat your oven to 350°F (175°C).
Preheating your oven is critical for ensuring an even bake. An adequately heated oven gives the cake the initial heat needed to rise properly. If the oven isn't hot enough, the cake may not achieve the desired airy texture, leading to a denser end product.
Step 2: Sift together the cake flour, 3/4 cup of the sugar, and salt.
Sifting the flour with sugar and salt not only removes lumps but blends the ingredients together, which leads to a more consistent cake batter. The incorporation of sugar alongside flour will contribute to the fluffiness of the cake, allowing for a perfect aeration process during mixing.
Step 3: In a large bowl, whisk the egg whites until frothy.
Starting with frothy egg whites indicates that they are on their way to being whipped into stiff peaks. This stage is crucial as it sets the foundation for a light and airy cake. Make sure your bowl is clean and free of grease, as any fat can inhibit the egg whites from achieving their full volume.
Step 4: Add cream of tartar and continue whisking until soft peaks form.
Adding cream of tartar at this stage stabilizes the egg whites, making it easier to achieve volume. Soft peaks will hold their shape but droop slightly when the whisk is lifted. This indicates that they are ready for the next step, where sugar will be introduced gradually.
Step 5: Gradually add the remaining 3/4 cup of sugar while whisking until stiff peaks form.
Incorporating the sugar slowly allows the egg whites to gradually absorb it without collapsing. Stiff peaks will stand upright when the whisk is lifted, indicating that the meringue is strong enough to provide structure for the cake.
Step 6: Fold in the flour mixture gently using a spatula.
Folding is a technique that combines the dry ingredients with the egg whites without deflating the batter. This step requires care; overmixing will cause the air bubbles to break, leading to a denser cake. Ensure you scrape from the bottom to incorporate all ingredients evenly.
Step 7: Mix in the vanilla extract and food coloring until just combined.
By adding vanilla extract and food coloring at this stage, you can ensure that these flavors and colors are evenly distributed throughout the batter. Mixing just until combined helps maintain the cake's light texture.
Step 8: Pour the batter into an ungreased tube pan.
Using an ungreased tube pan is essential as it allows the batter to cling to the sides during baking, enabling the cake to rise properly. The tube in the center promotes even heat circulation, resulting in a lovely, fluffy cake.
Step 9: Bake for 35-40 minutes or until the cake springs back when touched.
Baking times can vary, so it's crucial to monitor the cake closely. The spring-back test is a reliable indication that the cake is baked through. If the cake appears too dark, cover it loosely with foil to prevent burning while the inside continues to bake.
Step 10: Remove from the oven and invert the pan immediately.
Inverting the pan helps the cake to cool slowly while maintaining its height and structure. This technique prevents the cake from collapsing, which can happen if left to cool upright. If your pan doesn’t have feet, place it over a bottle to achieve the desired position.
Step 11: Let the cake cool completely before removing it from the pan.
Allowing the cake to cool entirely is crucial for easy removal from the pan without damaging it. If the cake is not completely cooled, it might stick to the pan, leading to an unsightly final product. Patience is key to achieving a perfect release.
Step 12: Gently run a knife around the edges to loosen and remove from the pan.
This final step ensures you avoid any cracks or tears in the cake as you release it from the pan. Running a knife around the edges creates a clean separation, allowing the cake to be inverted without falling apart.

Adding Flavor Variations to Your Pink Cake
While the classic vanilla flavor is delightful, consider adding variations to your Pink Angel Food Cake. For instance, replacing some vanilla extract with almond or lemon extract can provide an exciting twist. You can also fold in citrus zests or pureed berries into the batter for a different flavor profile, enhancing both taste and aesthetics.
Serving Suggestions for Pink Angel Food Cake
This charming cake can be enjoyed in various ways. Pair it with fresh berries and a dollop of whipped cream for a light dessert. Alternatively, serve it with a drizzle of berry sauce to enhance its pink color and provide a fruity contrast. For special occasions, consider pairing it with a light citrus glaze for an added touch.
Tips for Perfecting the Texture of the Cake
The key to a successful Pink Angel Food Cake lies in the texture. Ensure that your egg whites are at room temperature for optimal volume and that your mixing bowl is clean and dry. Additionally, be cautious while folding in the flour to retain as much air as possible. These small details will ensure your cake rises beautifully and maintains a light airiness.
FAQs
What can I do if my cake is too dense?
If your cake is too dense, it may be due to overmixing the batter. Ensure you fold gently and avoid deflating the whipped egg whites. Additionally, check that your baking powder is fresh, as old leavening agents can hinder rise.
Can I scale this recipe for a larger cake?
Yes, you can scale this recipe by multiplying the ingredients while keeping the ratios consistent. Just ensure your mixing bowl is large enough to accommodate the increased volume and that you monitor the baking time.
Why is my Pink Angel Food Cake not rising properly?
If the cake fails to rise, it could be due to under-whipped egg whites or insufficient baking time. Ensure your egg whites form stiff peaks, and consider checking for any old ingredients that may affect the rise.
Can I add more sugar for a sweeter cake?
You can add a little extra sugar, but be cautious, as too much may affect the cake's texture. A small increase should be fine, but balancing sweetness is essential.
What is causing a crusty top on my cake?
A crusty top can be a result of baking at too high a temperature or overbaking. Next time, reduce the temperature slightly and monitor the cake more closely towards the end of the baking time.
Can I use a different type of flour?
It is best to stick with cake flour for this recipe as it produces the right texture. Substituting with all-purpose flour will result in a denser cake.
Conclusion
Baking a Pink Angel Food Cake can be a rewarding experience, offering not just a delicious treat but also a visually stunning addition to any gathering. With its light texture and delightful flavor, it's a beloved classic that never fails to impress.
With the right techniques and a touch of creativity, this cake can become a staple in your baking repertoire. Whether for a special occasion or a simple afternoon dessert, delight your family and friends with this charming confection.
Recipe Card
Light and Fluffy Pink Angel Food Cake Recipe
Ingredients
Method
- Preheat your oven to 350°F (175°C).
- Sift together the cake flour, 3/4 cup of the sugar, and salt.
- In a large bowl, whisk the egg whites until frothy.
- Add cream of tartar and continue whisking until soft peaks form.
- Gradually add the remaining 3/4 cup of sugar while whisking until stiff peaks form.
- Fold in the flour mixture gently using a spatula.
- Mix in the vanilla extract and food coloring until just combined.
- Pour the batter into an ungreased tube pan.
- Bake for 35-40 minutes or until the cake springs back when touched.
- Remove from the oven and invert the pan immediately.
- Let the cake cool completely before removing it from the pan.
- Gently run a knife around the edges to loosen and remove from the pan.
Tried this recipe?
Let us know how it was!Notes
Additional serving suggestions: pair with a crisp salad, garlic bread, or roasted seasonal vegetables for balance.
For make-ahead, prep components separately and assemble just before heating to preserve texture.
Taste and adjust with acid (lemon/vinegar) and salt right at the end to wake up flavors.

