Festive No-Bake Grinch Christmas Cheesecake Treat
Ingredients
Method
- Prepare the crust
- Make the cheesecake filling
- Whip the cream
- Add food coloring
- Assemble the cheesecake
- Chill until set
- Decorate and serve
Tried this recipe?
Let us know how it was!Introduction
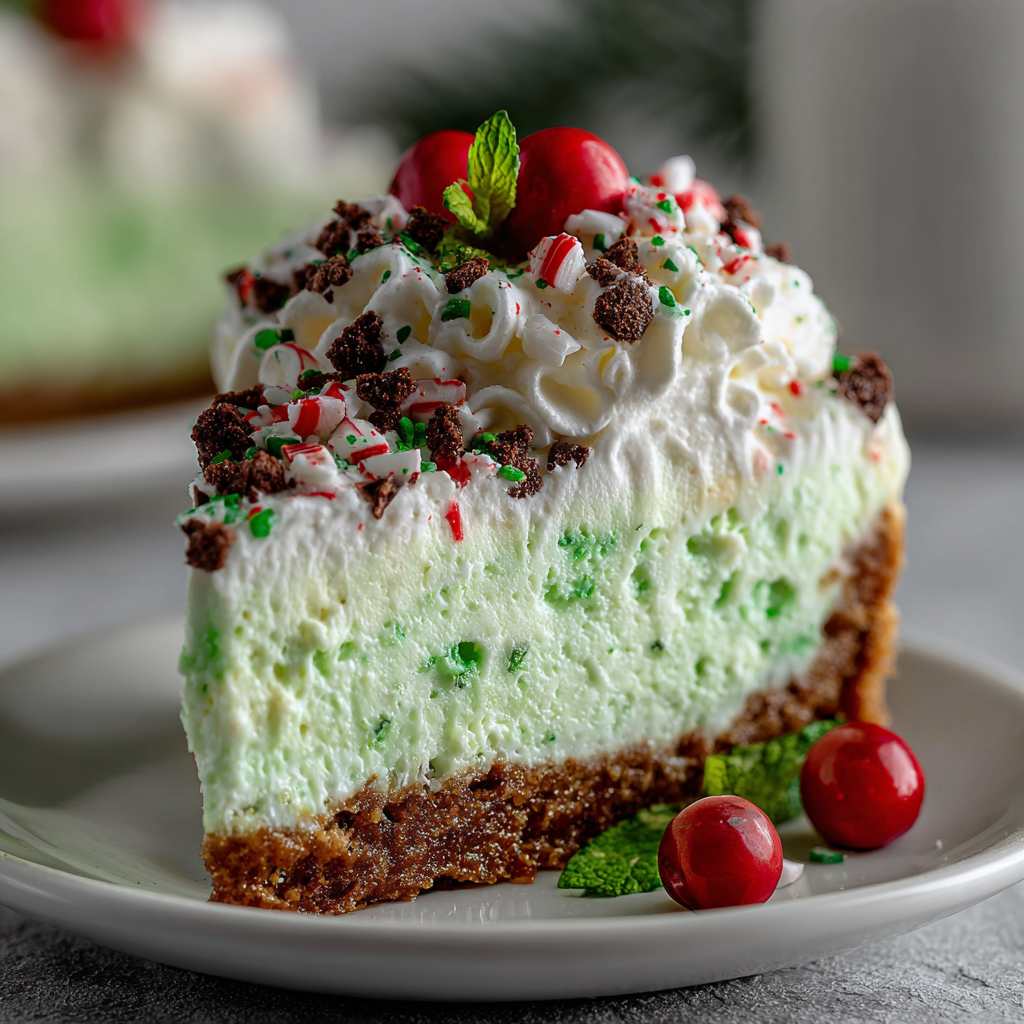
The holiday season is a magical time filled with joyful traditions, and what better way to celebrate than with a deliciously festive dessert? This No-Bake Grinch Christmas Cheesecake is an homage to Dr. Seuss’s beloved character, bursting with vibrant colors and cheerful flavors that will delight both kids and adults alike.
With its creamy texture and rich taste, this cheesecake offers a whimsical take on a classic favorite without the need for baking. It’s perfect for home cooks looking to create a festive centerpiece for holiday gatherings, allowing you to indulge in sweet, creamy goodness while saving valuable oven space.
Ingredients
- 2 cups graham cracker crumbs
These crumbs form the base of your cheesecake, providing a crunchy texture that complements the smooth filling. Their buttery flavor adds richness, making it an inviting foundation. - 1/2 cup unsalted butter, melted
The melted butter binds the graham cracker crumbs together, ensuring that your crust holds its shape. Its rich taste also enhances the overall flavor profile of the cheesecake. - 16 oz cream cheese, softened
Cream cheese is the star of the cheesecake filling, contributing to its smooth, creamy texture. Using softened cream cheese ensures easy mixing and a lump-free consistency. - 1 cup powdered sugar
Powdered sugar adds sweetness and helps to create a light texture in the filling. It dissolves easily, helping you avoid any graininess in your cheesecake. - 1 tsp vanilla extract
Vanilla extract adds depth of flavor and enhances the sweetness. Its warm, aromatic notes elevate the overall taste, making it a delightful treat. - 1 cup heavy whipping cream
Heavy cream contributes to the cheesecake's rich and velvety texture. When whipped, it adds lightness to the filling, ensuring a delightful mouthfeel. - Green food coloring
This fun ingredient gives the cheesecake its festive green hue, making it visually appealing and exciting for kids. Just a few drops transform the entire dessert into a Grinch-inspired delight. - Red sprinkles or candies for garnish
These festive decorations not only enhance the visual appeal but also add a touch of sweetness and crunch on top of the smooth cheesecake surface.
Directions & Preparation
Step 1: Prepare the crust
Start by combining the graham cracker crumbs and melted butter in a medium bowl. Mix them until the crumbs are fully coated and resemble wet sand. This mixture will serve as the foundation for your cheesecake, so it's important to ensure even distribution. Press the mixture firmly into the bottom of a springform pan to create a stable crust that can hold the filling without crumbling.
Step 2: Make the cheesecake filling
In a large mixing bowl, beat the softened cream cheese with powdered sugar and vanilla extract until smooth and free of lumps. This step is crucial; overmixing can lead to air bubbles in your filling, which could affect the cheesecake's sleek presentation. The mixture should be creamy and well combined before adding the whipped cream.
Step 3: Whip the cream
In a separate bowl, whip the heavy whipping cream until it forms soft peaks. This step adds lightness to your cheesecake. Gently fold the whipped cream into the cream cheese mixture, being careful not to deflate it. The goal is to retain as much air as possible to ensure a fluffy texture, which makes each slice of cheesecake irresistibly soft.
Step 4: Add food coloring
Incorporate green food coloring into the filling until you achieve your desired shade. This is a fun and creative moment, as the vibrant color will be the star of your dessert. Mix carefully to ensure an even distribution of color while preserving the lightness from the whipped cream.
Step 5: Assemble the cheesecake
Pour the green cheesecake filling over the prepared crust in the springform pan. Use a spatula to smooth the top, ensuring an even surface. This step helps in achieving a professional-looking finish and makes it easier to slice once set. Chill the cheesecake to allow it to firm up, enhancing the flavors and textures.
Step 6: Chill until set
Place the cheesecake in the refrigerator for at least 4 hours, or overnight if you have the time. This chilling process is essential for the cheesecake to set properly, ensuring that it holds its shape when sliced. The flavors will also meld beautifully during this time, creating a richer taste.
Step 7: Decorate and serve
Before serving, carefully remove the cheesecake from the springform pan. Top it with red sprinkles or festive candies to create a cheerful holiday message. This final touch not only enhances the visual appeal but also adds an extra layer of flavor and texture to each slice. Your No-Bake Grinch Christmas Cheesecake is now ready to wow your guests!

A Delightfully Colorful Creation
This cheesecake captures the whimsical essence of the Grinch perfectly, making it a delightful centerpiece at any holiday gathering. The bright green hue is complemented by decorative red sprinkles, creating a visual feast that draws everyone in. Not only does it look festive, but the vibrant color adds an element of fun, enticing both kids and adults to indulge.
No-Bake Convenience
One of the great benefits of this Grinch cheesecake is its no-bake nature, allowing busy cooks to save time while still serving a show-stopping dessert. Without the need for oven time, you can effortlessly prepare this cheesecake while focusing on other holiday festivities. This recipe is ideal for gatherings where you want to impress without the added pressure of complex baking.
Customizing Your Grinch Cheesecake
Feel free to let your creativity shine by customizing this Grinch cheesecake to reflect your own tastes. Consider adding layers of fruit preserves or even a swirl of melted chocolate into the filling for an added twist. You can also experiment with different crusts, such as crushed Oreos or vanilla wafers, to create a unique flavor that matches your holiday theme.
FAQs
What can I do if my cheesecake filling is too thick?
If your cheesecake filling is too thick, try gradually adding in a bit more whipped cream or a splash of milk to loosen it. Mix gently until you achieve the desired consistency.
How can I make this cheesecake less sweet?
To reduce the sweetness, decrease the amount of powdered sugar slightly, tasting as you go. Opting for a cream cheese with less sugar can also help maintain a balanced flavor.
Can I use a different type of crust?
Absolutely! You can substitute the graham cracker crust with crushed Oreos, vanilla wafers, or even a nut-based crust if you prefer a different flavor profile.
How do I know when the cheesecake is fully set?
You'll know the cheesecake is set when the filling is firm to the touch and holds its shape well. It should not jiggle significantly when moved.
What type of food coloring works best?
Gel food coloring is recommended for achieving vibrant colors without affecting the texture. Liquid food coloring can work too, but may require more to achieve the same depth of color.
Can I add flavors to the cream cheese mixture?
Yes, adding a few drops of peppermint or almond extract can enhance the flavor profile. Just be cautious not to overpower the base flavor of the cheesecake.
Conclusion
This No-Bake Grinch Christmas Cheesecake is not only a distinctive dessert but also a delightful way to bring a piece of holiday cheer to your table. Its combination of creamy texture, festive colors, and sweet flavors will surely impress your guests, making it a favorite for years to come.
Whether you are hosting a holiday party or simply looking for a fun dessert to make with your family, this cheesecake offers a deliciously unique experience that captures the spirit of the season.
Recipe Card
Festive No-Bake Grinch Christmas Cheesecake Treat
Ingredients
Method
- Prepare the crust
- Make the cheesecake filling
- Whip the cream
- Add food coloring
- Assemble the cheesecake
- Chill until set
- Decorate and serve
Tried this recipe?
Let us know how it was!Notes
Additional serving suggestions: pair with a crisp salad, garlic bread, or roasted seasonal vegetables for balance.
For make-ahead, prep components separately and assemble just before heating to preserve texture.
Taste and adjust with acid (lemon/vinegar) and salt right at the end to wake up flavors.