
Decadent Oreo Cake for Home Bakers
Ingredients
Method
- Preheat your oven to 350°F (175°C) and prepare two 9-inch round baking pans by greasing and flouring them.
- In a large bowl, mix together the dry ingredients: flour, sugar, cocoa powder, baking powder, baking soda, and salt.
- Add the wet ingredients: eggs, milk, vegetable oil, and vanilla extract. Mix until smooth.
- Carefully stir in the boiling water to the batter until just combined.
- Divide the batter evenly between the prepared pans and bake for 30 to 35 minutes, or until a toothpick comes out clean.
- Once baked, remove the cakes from the oven and let them cool in the pans for 10 minutes before transferring them to a wire rack to cool completely.
- Prepare the filling by beating the cream cheese until smooth, then gradually add powdered sugar and crushed Oreos.
- Once the cake layers are completely cool, place one layer on a serving plate and spread an even layer of the filling on top.
- Place the second layer on top and spread frosting over the entire cake, smoothing it out as needed.
- Garnish with additional crushed Oreos on top for an extra touch and flavor.
- Slice, serve, and enjoy this delightful Oreo cake with family and friends!
Tried this recipe?
Let us know how it was!Introduction
Indulging in a sweet treat can be a delightful experience, especially when it involves cookies and cake. This Oreo cake is perfect for those moments when you need a chocolate fix paired with the creamy goodness of Oreo cookies. It's a dessert that brings joy to any occasion, whether it's a birthday, anniversary, or simply a weekend treat.
The combination of rich chocolate cake, creamy filling, and the crunch of Oreos creates a symphony of flavors and textures that is hard to resist. Baking this cake at home not only allows you to savor every bite, but it also provides an opportunity to showcase your baking skills. Let’s dive into the details of this delicious creation!
Ingredients
- 1 ¾ cups all-purpose flour
All-purpose flour forms the structure of the cake, providing the necessary gluten to hold everything together while allowing it to remain light and tender. - 1 ½ cups granulated sugar
Sugar sweetens the cake and contributes to its moisture. It also helps in achieving a lovely golden crust during baking. - ¾ cup unsweetened cocoa powder
Cocoa powder adds a deep chocolate flavor and rich color to the cake, making it a true treat for chocolate lovers. - 1 ½ teaspoons baking powder
This leavening agent is crucial for making the cake rise. It creates air pockets in the batter, resulting in a fluffy texture. - 1 ½ teaspoons baking soda
Baking soda helps the cake to rise further and balances acidity from the cocoa, ensuring a tender crumb. - 1 teaspoon salt
Salt enhances the flavors of the other ingredients and balances the sweetness, making for a more rounded cake. - 2 large eggs
Eggs act as binders, helping to hold the cake together while also contributing moisture and richness. - 1 cup whole milk
Milk hydrates the dry ingredients and adds moisture, creating a tender cake. It also enriches the flavor. - ½ cup vegetable oil
Oil adds moisture and helps keep the cake fresh longer, contributing to a soft crumb without weighing it down. - 2 teaspoons vanilla extract
Vanilla enhances the sweetness and complexity of flavors, creating a more enjoyable dessert. - 1 cup boiling water
Boiling water helps dissolve the cocoa powder completely, intensifying the chocolate flavor and ensuring a smooth batter. - 8 ounces cream cheese, softened
Cream cheese serves as the base for the frosting and filling, providing richness and tang that complements the sweetness of the cake. - 4 cups powdered sugar
Powdered sugar sweetens the frosting and filling, giving it a silky texture that spreads easily over the cake. - 1 cup crushed Oreo cookies
These add a crunchy texture and a delightful chocolate flavor, enhancing both the filling and the cake's overall experience. - ½ cup heavy cream
Heavy cream helps create a rich and smooth frosting, giving it a luscious texture that's perfect for spreading.
Directions & Preparation
Step 1: Preheat your oven to 350°F (175°C) and prepare two 9-inch round baking pans by greasing and flouring them.
Preheating ensures that the oven reaches the ideal temperature for baking the cakes evenly. Greasing and flouring the pans helps prevent sticking, allowing for easy release after baking.
Step 2: In a large bowl, mix together the dry ingredients: flour, sugar, cocoa powder, baking powder, baking soda, and salt.
Combining the dry ingredients first ensures they are evenly distributed throughout the batter. This promotes consistent flavor and leavening, resulting in a uniformly baked cake.
Step 3: Add the wet ingredients: eggs, milk, vegetable oil, and vanilla extract. Mix until smooth.
Incorporating wet ingredients into the dry mix creates a batter. Mixing until smooth ensures that all ingredients are well combined, paving the way for a tender cake.
Step 4: Carefully stir in the boiling water to the batter until just combined.
Adding boiling water enhances the cocoa's richness, creating a more flavorful cake. The liquid batter will be thin, but this is expected and necessary for a moist result.
Step 5: Divide the batter evenly between the prepared pans and bake for 30 to 35 minutes, or until a toothpick comes out clean.
Evenly dividing the batter helps ensure both layers bake uniformly. Baking until a toothpick comes out clean is crucial for determining doneness, preventing overcooking.
Step 6: Once baked, remove the cakes from the oven and let them cool in the pans for 10 minutes before transferring them to a wire rack to cool completely.
Allowing the cakes to cool in the pans helps them set, minimizing breakage. Transferring to a wire rack allows for proper cooling, preventing moisture buildup.
Step 7: Prepare the filling by beating the cream cheese until smooth, then gradually add powdered sugar and crushed Oreos.
Beating the cream cheese first creates a smooth base, ensuring a better mixture when adding sugar and Oreos. Gradually adding ingredients prevents lumps in the filling.
Step 8: Once the cake layers are completely cool, place one layer on a serving plate and spread an even layer of the filling on top.
Using a cooled cake prevents the filling from melting or sliding off. A well-spread filling enhances flavor in every bite, adding to the cake's allure.
Step 9: Place the second layer on top and spread frosting over the entire cake, smoothing it out as needed.
Frosting-overlapping layers helps seal in the filling and creates a visually appealing cake. Smooth frosting provides a polished finish.
Step 10: Garnish with additional crushed Oreos on top for an extra touch and flavor.
Garnishing with crushed Oreos adds visual appeal and reinforces the Oreo flavor, making the cake even more inviting.
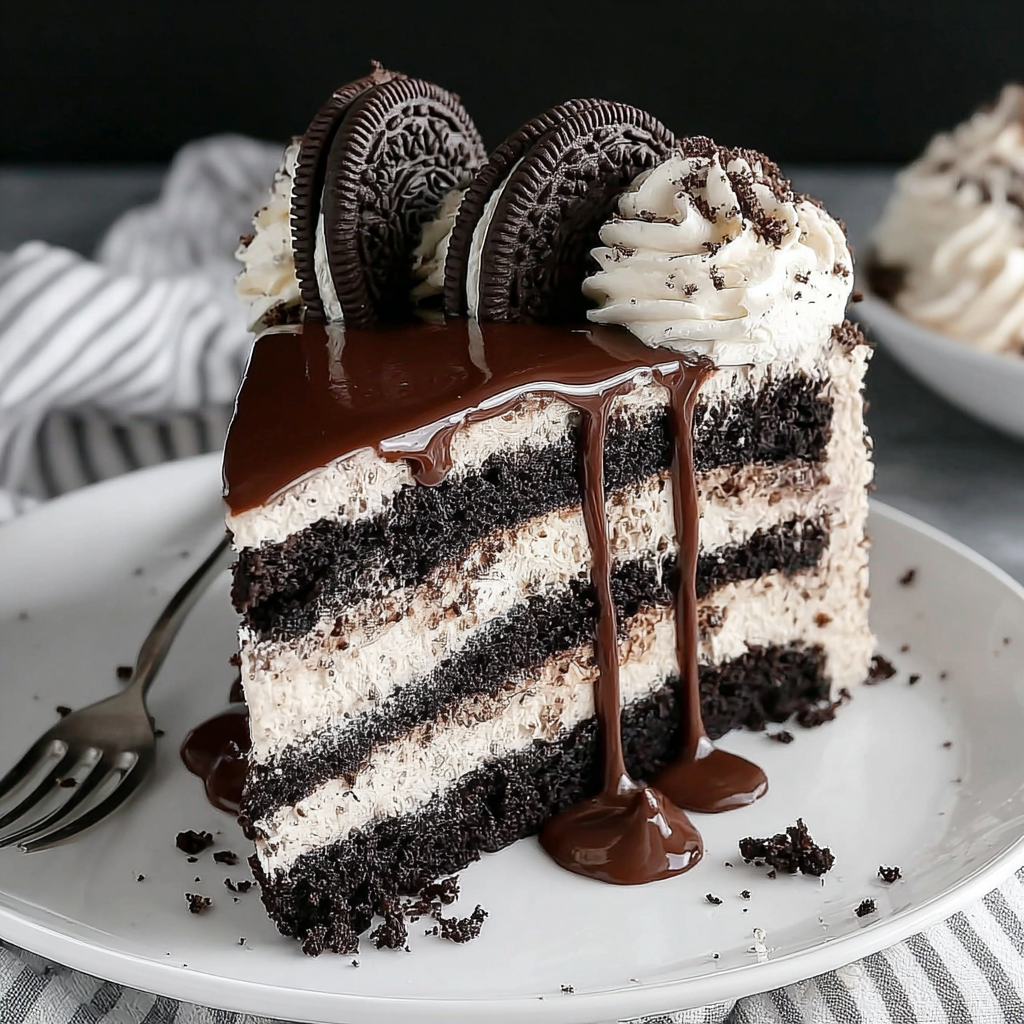
Step 11: Slice, serve, and enjoy this delightful Oreo cake with family and friends!
Slicing properly reveals beautiful layers, encouraging sharing and enjoyment among guests. This cake promises to be a hit, celebrated for its decadent flavors.

The Magic of Mixing Milk and Oil
Utilizing both milk and oil in this cake makes it exceptionally tender and moist. The milk aids in hydration while providing richness, whereas the oil grants lasting moisture and prevents drying, making each bite satisfying even days after baking.
Oreo Cookies: More Than Just Crumbs
Crushing up Oreos for the filling isn’t merely for taste; it adds texture and that signature chocolate flavor. These cookie bits create delightful pockets of crunch that elevate the creamy filling, giving each slice a wonderful surprise.
Layering for Maximum Flavor
The two-layer structure of this cake is essential for flavor and presentation. Each layer is not only delicious on its own but combined, they create a harmony that enhances the overall eating experience. It’s a twice-as-nice treat!
FAQs
What if my cake layers are too dry?
If the layers turn out dry, it may be a result of overbaking. Monitor baking time closely in your next attempt and consider brushing the layers with simple syrup for added moisture.
Can I use less sugar in the frosting?
Yes, you can reduce the sugar in the frosting, but keep in mind it may affect the texture. The frosting needs sugar for stability, so aim to subtract gradually and taste as you go.
What if my filling is too thick?
If your filling seems too thick, gradually add a little milk or cream to loosen it up. This will achieve a smoother consistency that is easier to spread.
Can I use chocolate frosting instead of cream cheese frosting?
Absolutely! Chocolate frosting can provide a rich twist to the cake's flavor. Make sure it complements the overall dessert without overwhelming the Oreo taste.
How can I enhance the chocolate flavor?
To intensify the chocolate flavor, consider adding a tablespoon of instant espresso powder to the dry ingredients, which enhances the depth of chocolate.
What happens if I overmix the batter?
Overmixing can lead to a dense cake because it develops too much gluten in the flour. Mix until just blended to ensure a light and tender structure.
Conclusion
Baking an Oreo cake at home is a gratifying experience that yields delicious results. The richness of chocolate, creamy filling, and cookie crunch make it a standout dessert.
Whether you're celebrating a special occasion or just craving something sweet, this cake is sure to impress. Don’t shy away from indulging your sweet tooth – it's well worth the effort!
Recipe Card
Decadent Oreo Cake for Home Bakers
Ingredients
Method
- Preheat your oven to 350°F (175°C) and prepare two 9-inch round baking pans by greasing and flouring them.
- In a large bowl, mix together the dry ingredients: flour, sugar, cocoa powder, baking powder, baking soda, and salt.
- Add the wet ingredients: eggs, milk, vegetable oil, and vanilla extract. Mix until smooth.
- Carefully stir in the boiling water to the batter until just combined.
- Divide the batter evenly between the prepared pans and bake for 30 to 35 minutes, or until a toothpick comes out clean.
- Once baked, remove the cakes from the oven and let them cool in the pans for 10 minutes before transferring them to a wire rack to cool completely.
- Prepare the filling by beating the cream cheese until smooth, then gradually add powdered sugar and crushed Oreos.
- Once the cake layers are completely cool, place one layer on a serving plate and spread an even layer of the filling on top.
- Place the second layer on top and spread frosting over the entire cake, smoothing it out as needed.
- Garnish with additional crushed Oreos on top for an extra touch and flavor.
- Slice, serve, and enjoy this delightful Oreo cake with family and friends!
Tried this recipe?
Let us know how it was!Notes
Additional serving suggestions: pair with a crisp salad, garlic bread, or roasted seasonal vegetables for balance.
For make-ahead, prep components separately and assemble just before heating to preserve texture.
Taste and adjust with acid (lemon/vinegar) and salt right at the end to wake up flavors.